用P2刚体属性实现贴图
上一节,我们学习了P2物理引擎的基本用法,并使用P2DebugDraw绘制出模拟结果。实际上,只要知道了刚体的坐标、角度,并相应的更新图片素材的位置等属性,就可以轻松的实现贴图啦。
本节,我们就来学习一下刚体常用的属性,这些属性主要分为3大类:
角度相关属性
- angle :角度。刚体的角度
- angularDamping :角速度阻尼。刚体在角速度方向上收到的阻尼
- angularForce :扭力。刚体在角速度方向上收到的扭力
- angularVelocity :角速度。刚体的角速度
- previousAngle :前角度。上一次step()执行后刚体的角度
- interpolatedAngle :后角度。下一次step()刚体预计的角度
速度相关属性
- position :坐标。刚体的坐标位置
- damping :速度阻尼。刚体在线性速度方向上收到的阻尼
- force :作用力。刚体在线性速度方向上收到的扭力
- velocity :速度。刚体的速度
- previousPosition :前坐标。上一次step()执行后刚体的坐标
- interpolatedPosition :后坐标。下一次step()刚体预计的坐标
其他属性
- type :刚体类型。刚体当前应用的类型,Dynamic、Kinematic或Static
- fixedRotation :锁定角度。锁定角度后,刚体角度不发生变化,可以用于横版游戏人物
- gravityScale :重力本例。=0时,刚体不受重力影响;<0时,刚体向上移动。
- mass :刚体质量。刚体的质量,用于作用力等需要质量的公式运算
- inertia :角速度惯性。刚体在角速度上的惯性,值越大惯性越大
- shapes :形状。刚体中绑定的所有形状清单
举个栗子
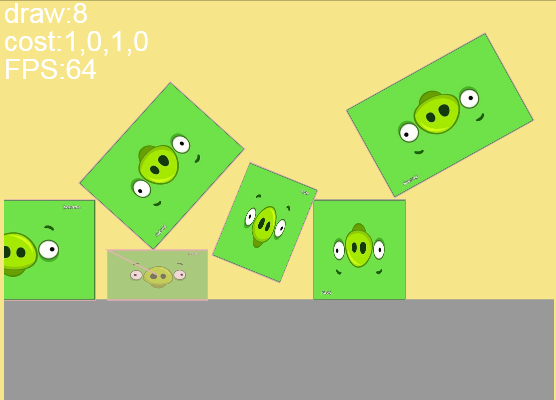
掌握了刚体的这些属性,给物理游戏贴图,简直就和扣鼻屎一样的简单和爽快了,在P2中实现的贴图效果如下图所示:
大痔过程
创建示例的大痔过程如下:
1>为刚体body自定义一个任意名称的属性,如userData,利用这个属性为刚体绑定一个贴图对象。
需要说明的是,Egret团队为p2中的Body类添加了一个数组类型的displays属性。本例中我按照Box2D里的习惯,添加了userData属性,来绑定自定属性,包括素材图片。
        this.addChild(asset);
        body.userData = asset;
2>遍历世界中的每一个刚体,并访问刚体的position和angle属性。
this.world.bodies.forEach(function (b: p2.Body) {
3>根据刚体的角度和坐标,来更新贴图的位置和角度,实现贴图与刚体的同步运动。
            if (b.userData != null) {
                b.userData.x = b.position[0];
                b.userData.y = b.position[1];
                b.userData.rotation = b.angle*180/Math.PI;
            }
        });
完整的代码如下:
class Main extends AbstractP2Test {
    private debugDraw: p2DebugDraw;
    private world: p2.World;

    public constructor() {
        super();
    }
    public onAppReady(): void {
        this.createWorld();
        this.createGround();
        this.createBodies();
        this.createDebug();

        this.stage.addEventListener(egret.TouchEvent.TOUCH_BEGIN, this.addOneBox, this);
    }
    private createWorld(): void {
        var wrd:p2.World = new p2.World();
        wrd.sleepMode = p2.World.BODY_SLEEPING;
        wrd.gravity = [0,10];
        this.world = wrd;
    }
    private createGround(): void {
        var stageHeight:number = egret.MainContext.instance.stage.stageHeight;
        var groundShape: p2.Plane = new p2.Plane();
        var groundBody: p2.Body = new p2.Body();
        groundBody.position[1] = stageHeight-100;
        groundBody.angle = Math.PI;
        groundBody.addShape(groundShape);

        this.world.addBody(groundBody);
    }
    private createBodies(): void {
        var boxShape: p2.Rectangle = new p2.Rectangle(100, 50);
        var boxBody: p2.Body = new p2.Body({ mass: 1, position: [200, 200] });
        boxBody.addShape(boxShape);
        this.world.addBody(boxBody);
        this.bindAsset(boxBody, boxShape);

        boxShape = new p2.Rectangle(50, 50);
        var boxBody: p2.Body = new p2.Body({ mass: 1, position: [200, 180],angularVelocity:1 });
        boxBody.addShape(boxShape);
        this.world.addBody(boxBody);
        this.bindAsset(boxBody, boxShape);
    }
    private createDebug(): void {
        egret.Profiler.getInstance().run();

        this.debugDraw = new p2DebugDraw(this.world);

        var sprite: egret.Sprite = new egret.Sprite();
        this.addChild(sprite);
        this.debugDraw.setSprite(sprite);
    }
    public loop(): void {
        this.world.step(60 / 1000);
        this.world.bodies.forEach(function (b: p2.Body) {
            if (b.userData != null) {
                b.userData.x = b.position[0];
                b.userData.y = b.position[1];
                b.userData.rotation = b.angle*180/Math.PI;
            }
        });
        this.debugDraw.drawDebug();
    }
    private addOneBox(e: egret.TouchEvent): void {
        var positionX: number = Math.floor(e.stageX);
        var positionY: number = Math.floor(e.stageY);

        var boxShape: p2.Rectangle = new p2.Rectangle(Math.random() *150 + 50, 100);
        var boxBody: p2.Body = new p2.Body({ mass: 1, position: [positionX, positionY], angularVelocity: 1 });
        boxBody.addShape(boxShape);
        this.world.addBody(boxBody);
        this.bindAsset(boxBody, boxShape);
    }
    private bindAsset(body: p2.Body, shape: p2.Rectangle): void {
        var asset: egret.Bitmap = this.getBitmapByRes("asset");
        asset.scaleX = shape.width / asset.width;
        asset.scaleY = shape.height / asset.height;
        this.addChild(asset);
        body.userData = asset;
    }
    private getBitmapByRes(resName): egret.Bitmap {
        var bitmap: egret.Bitmap = new egret.Bitmap();
        bitmap.texture = RES.getRes("asset");
        bitmap.anchorOffsetX = bitmap.width / 2;
        bitmap.anchorOffsetY = bitmap.height / 2;
        return bitmap;
    }
}
需要说明的是,以上没有加载素材相关的代码,为了更专注p2物理引擎的示例代码,加载素材的代码部分,被我集中到了AbstractP2Test.ts文件中了,你可以下载源代码进行查看。
如果你对素材的加载还不是很熟悉,请参考@郭少瑞_NeoGuo 的教程http://bbs.egret-labs.org/thread-248-1-1.html
代码很简单,重点是:
1>getBitmapByRes()函数中,创建的Bitmap对象,记得通过anchorOffsetX/Y设置控制点坐标,因为位图加载进来之后,默认是以左上角为初始原点的。
2>在bindAsset()函数中,通过userData属性,为刚体绑定图片素材。因为刚体与素材的尺寸不一样,所以这里通过scaleX/Y调整了图像素材asset的尺寸。
3>在loop()函数中,根据刚体的position和angle(弧度)属性,更新图像素材userData的属性。
点击链接下载原文件
http://yun.baidu.com/s/1gdALIQf
下集预告
P2中的形状
联系作者